Scandinavian-Style Christmas Paper Crafts for a Cosy, Natural Home
There’s something lovely about Christmas decorations made from paper. The soft colours, the shadows caught in the folds, and the way a simple sheet can become something worth bringing out each December.
If you love a Scandinavian-inspired Christmas, paper decorations are a lovely place to start. Think warm whites, kraft paper and simple shapes, hung from a branch or gathered along a windowsill.
These three makes use inexpensive materials and a few basic folds. Put the kettle on, clear a little space at the table and take your time.

What you’ll need
Most of these supplies may already be tucked away at home:
- Lightweight paper in white, cream or kraft brown
- Scissors
- A ruler and pencil
- Glue stick or craft glue
- Fine string, thread or ribbon
- A hole punch or needle for adding hanging thread
Ordinary paper is easier to fold than thick card. Try a practice version with scrap paper before using anything special.
1. Folded Paper Rosettes

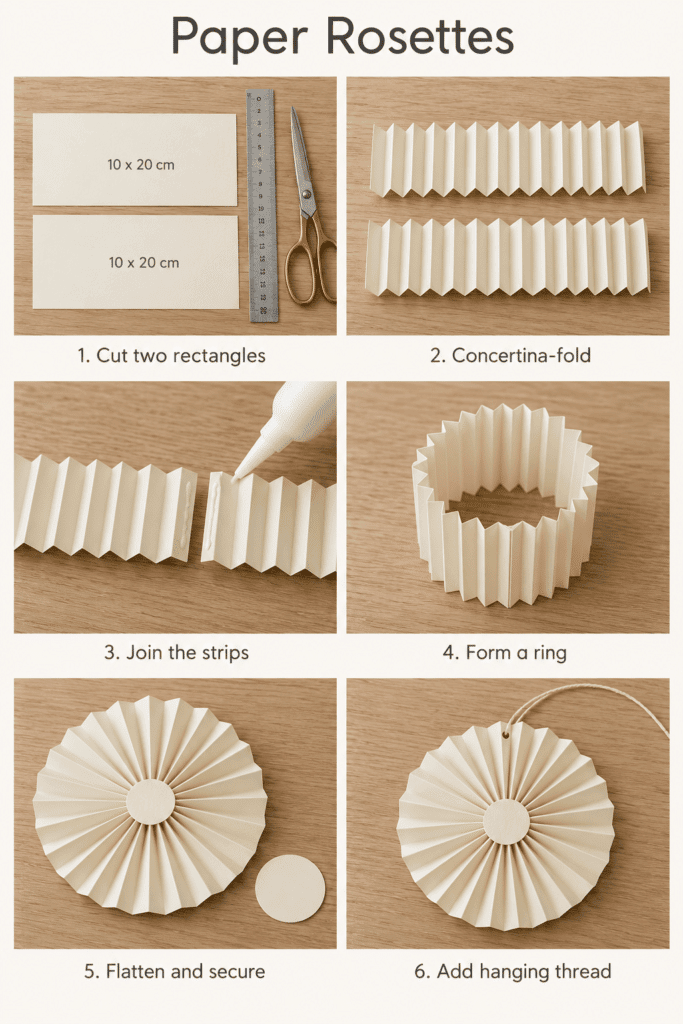
These pleated circles look beautiful hanging at different heights in a window. Make a few sizes in the same colour for a simple, coordinated display.
How to make them
- Cut two matching rectangles. For a small decoration, start with two pieces approximately 10cm high and 20cm wide.
- Concertina-fold each piece. With a long edge facing you, fold a strip about 1cm wide, turn the paper over and fold back in the other direction. Continue across the full length.
- Join the strips. Glue the final pleat of one strip onto the first pleat of the other, creating one long concertina.
- Make a ring. Join the two remaining ends with glue, keeping the folds running in the same direction.
- Flatten into a rosette. Stand the ring on a table, then gently push its upper edge down and towards the centre until it opens into a flat, pleated circle.
- Secure the middle. Glue a small paper circle over the centre on each side. Hold it flat while the glue sets.
- Add a hanging loop. Make a small hole near the outer edge and thread through a length of cotton or fine string.
If the centre keeps springing up, rest a light book on it while the glue dries.
Styling idea: Hang three rosettes at different heights from a bare branch, using fine thread so the paper shapes take centre stage.
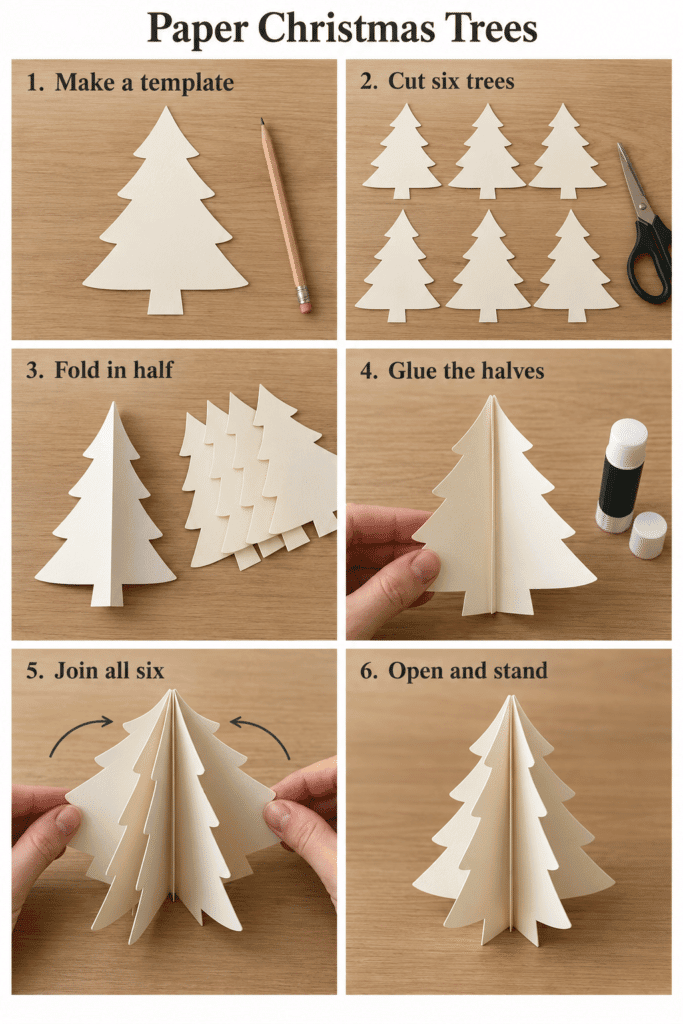
2. Freestanding Paper Christmas Trees

A little group of paper trees makes a lovely decoration for a shelf, mantelpiece or Christmas table. Keep them all cream, or mix white and kraft paper for a softer woodland feel.
How to make them
- Create a tree template. Fold a piece of scrap paper in half vertically. Draw half a simple Christmas tree along the fold, including a short trunk and a flat base. Cut it out and unfold.
- Cut six matching trees. Use your template to draw and cut six shapes from your chosen paper.
- Fold each tree in half. Fold vertically from the top point to the base, making a neat crease.
- Join the first two trees. Apply glue to one outer half of a folded tree and press it against an outer half of the next.
- Keep adding shapes. Repeat until all six folded trees are joined in a stack.
- Close the shape. Glue the two remaining outer halves together, opening the paper sections around the centre.
- Stand and adjust. Gently spread the sections evenly so the tree stands upright. Trim the base carefully if needed.
Start with trees around 12–15cm tall. Once you’re happy with the technique, try a taller version to sit behind them.
Styling idea: Arrange an odd number of trees in different heights on a wooden tray, leaving a little space between each one.
3. A Simple Paper Star Garland
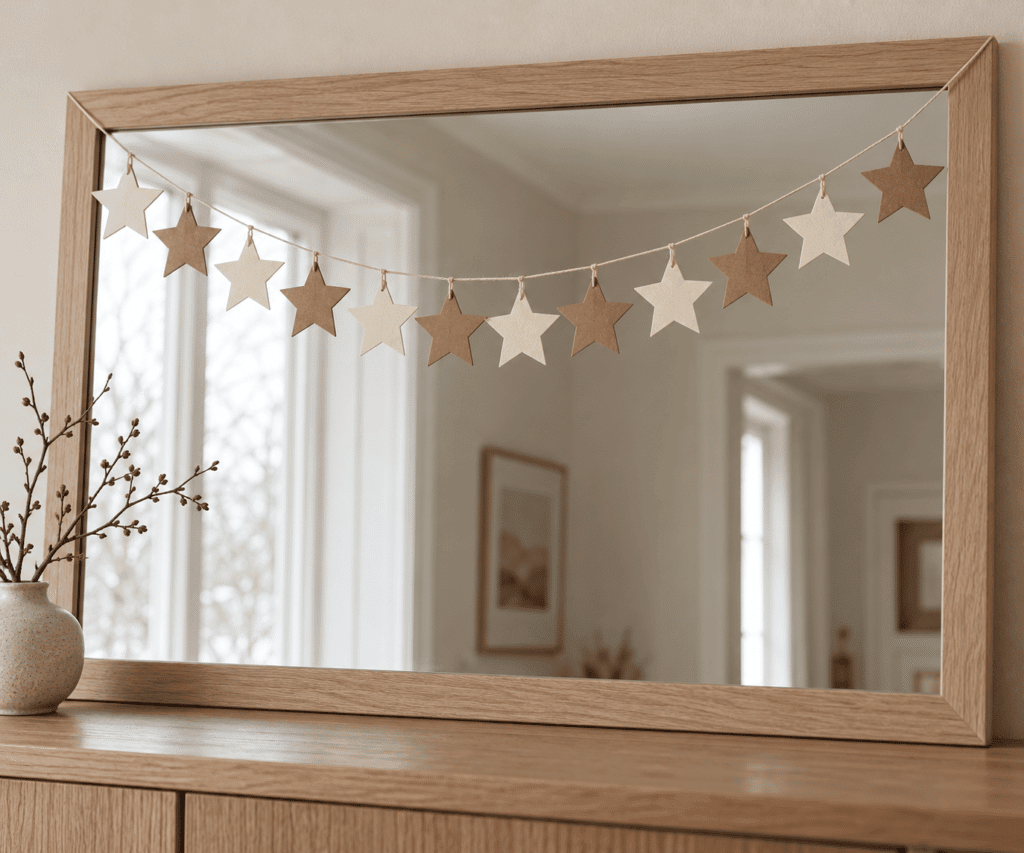
Flat paper stars are an easy way to add a little Christmas detail without making a room feel crowded. A restrained colour palette helps keep the finished garland calm and understated.
How to make it
- Make a star template. Draw a five-pointed star on scrap card, or trace a shape you already have.
- Cut your stars. Cut around 12–16 stars from paper. You can keep them the same size or alternate two sizes.
- Plan the spacing. Lay a length of fine string on a table and arrange the stars beneath it, leaving approximately 8–10cm between them.
- Attach each star. Place the string across the back of a star, just below its upper point. Glue a small strip of matching paper over the string to hold it in place.
- Leave it flat to dry. Allow the glue to set before lifting your garland.
- Hang loosely. Leave enough string at either end to create a gentle curve when displayed.
For a more substantial finish, sandwich the string between two matching stars instead.
Styling idea: Drape the garland across a mirror, along a shelf or above a sideboard. A single strand is often enough.

Keeping the Look Simple
You don’t need lots of different papers or embellishments. Choosing two or three colours lets the shapes and folds do most of the work.
Warm white looks lovely against wood, while kraft paper brings a little warmth to pale walls. If you want some colour, try a muted green ribbon or a few deep red stars.
These decorations also work well as finishing touches for presents. Tie a small star onto a parcel, or use a paper rosette in place of a bow.
Keep paper decorations away from candles, fires and other heat sources. Battery-powered candles give a soft glow nearby.
Pack Them Away for Next Year
Once Christmas is over, store the decorations somewhere dry. Lay the garlands flat between sheets of tissue and pack the trees and rosettes in a shallow box where they won’t be crushed.
Part of the charm is bringing something handmade out again. A slightly uneven star or an imperfect fold can become a familiar little part of Christmas.
K Elizabeth xoxox